
Kali ini saya akan share tugas mengenai cara Reset Konfigurasi RouterBoard MikroTik, Mengganti Nama Interface, Aktif dan Non-aktif Interface, Merubah Interface RouterBoard menjadi Interface Switch secara virtual, dan Setting Koneksi Internet MikroTik Staic dan Dynamic (via LAN)
(This time I will share the task of how to configuration reset MikroTik RouterBoard, change the name interface, enable and disable interface, change interface RouterBoard be a interface Switch virtually, and setting internet connection MikroTik Static and Dynamic (via LAN)
(This time I will share the task of how to configuration reset MikroTik RouterBoard, change the name interface, enable and disable interface, change interface RouterBoard be a interface Switch virtually, and setting internet connection MikroTik Static and Dynamic (via LAN)

(Purpose)
- Dapat mengetahui cara mengubah nama interface
- Dapat mengetahui cara mengaktifkan interface
- Dapat mengetahui cara me-non aktifkan interface
- Dapat mengetahui cara mengubah interface RouterBoard menjadi Switch
- Dapat mengetahui cara konfigurasi internet menjadi static dan dynamic/DHCP
- Dapat mengetahui cara konfigurasi firewall NAT pada RouterBoard MikroTik
(- Can know how to change the name interface
- Can know how to enable interface
- Can know how to disable interface
- Can know how to change the interface's RouterBoard be interface's Switch
- Can know how to configuration internet be a static and dynamic or DHCP
- Can know how to configuration firewall NAT in RouterBoard MikroTik)
B. Perlengkapan
(Materials)
- 1 Unit PC/Notebook
- RouterBoard
- Kabel UTP
- Switch CISCO
- Kabel Power
- WinBox
(- 1 Unit PC/Notebook
- RouterBoard
- UTP Cable
- Switch CISCO
- Power Cable
- WinBox)
C. Langkah - Langkah
(Steps)
Masuk ke "Network Connections", lalu matikan adapter VirtualBox dan Wi-Fi anda
(Go to the "Network Connections", then disable your VirtualBox and Wi-Fi adapter)

Reset Konfigurasi
(Configuration Reset)
Buka WinBox, lalu masuk dengan MAC Address
(Open WinBox, then choose login with MAC Address)
(Open WinBox, then choose login with MAC Address)

Pilih Connect
(Choose Connect)

Pilih "System → Reset Configurastion"
(Choose "System → Reset Configuration")

Klik "Reset Configuration"
(Click "Reset Configuration")

Pilih "Yes"
(Choose "Yes")

Mengubah Nama Interface
(Change Interface Name)
Buka WinBox, klik "..."
(Open WinBox, click "...")

Karena tadi konfigurasinya sudah di reset maka tidak ada IP Address nya, pilih masuk dengan MAC Address
(Because before that the configuration has been reset confguration then no IP Address, choose login with MAC Address)
(Because before that the configuration has been reset confguration then no IP Address, choose login with MAC Address)

Klik "Connect"
(Click "Connect")

• Via CLI
Pilih "New Terminal"
(Choose "New Terminal")

Cek interface dengan mengetikkan "int pr" atau "interface print" lalu tekan ENTER
(Check interface with the type "int pr" or "interface print" and then press ENTER)

Ubah nama interface 0/ether1 menjadi public dan ubah nama interface 1 /ether2 menjadi local
(Change the interface name 0/ether1 be a public and change the interface name 1/ether2 be a local)

Cek lagi interface nya dengan mengetikkan perintah "interface print" lalu tekan ENTER
(Check again a interface with the type command "interface print" and then press ENTER)

• Via GUI
Pilih "Interfaces"
(Choose "interfaces")

Karena tadi via CLI nama interface "ether1" dan "ether2" nya sudah diubah maka bisa dilihat via GUI juga sudah berubah nama interface nya menjadi "local" dan "public"
(Because before via CLI interface name "ether1" and "ether2" it can be seen via GUI has changed too be a interface name "local" and "public")
(Because before via CLI interface name "ether1" and "ether2" it can be seen via GUI has changed too be a interface name "local" and "public")

Enable Interface
• Via GUI
Pilih "Interfaces"
(Choose "Interfaces")

Klik pada "ether3" lalu pilih tanda "ü"
(Click "ether3" then choose symbol "ü")

Bisa terlihat bahwa ether3 telah berhasil di aktifkan
(Can see aht ether3 has success enable)

• Via CLI
Cek interface dengan mengetikkan perintah "interface print" terlihat ether3 sudah aktif
(Check interface with type command "interface print" looks ether3 has enable)

• Via GUI
Matikan kembali ether3 nya, dengan klik pada "ether3" lalu pilih tanda "X"
(Disable ether3, with click a "ether3" then choose symbol "X")

• Via CLI
Cek kembali via CLI apakah ether3 sudah non-aktif atau belum, jika terdapat tanda "X" maka ether3 sudah berhasil di non-aktifkan
(Check agan via CLI whether ether3 already disable or not, if there is an "X" then ether3 been successfully disabled)

Aktifkan interface "wlan1" dengan mengetikkan "interface enable 5"
(Enable interface "wlan1" with type "interface enable 5")

Cek interface apakah interface "wlan1" sudah aktif atau belum, jika tidak ada tanda "X" maka interface wlan1 berhasil diaktifkan
(Check the interface if the interface "wlan1" is enable or not, if there is no symobl "X" then the interface wlan1 successfully enabled)

• Via GUI
Klik pada interface "wlan1" lalu pilih tanda "X" untuk menonaktifkan interface wlan1
(Click interface "wlan1" then choose symbol "X" for disable interface wlan1)

Jika sudah seperti gambar berikut, berarti interface wlan1 sudah berhasil dinonaktifkan
(If already as shown below, then interface wlan1 been successfully disabled)

• Via CLI
Cek interface apakah interface wlan1 sudah dinonaktifkan atau belum, jika tedapat tanda "X" berarti interface wlan1 sudah berhasil dinonaktifkan
(Check interface whether interface wlan1 has disable or not, if mark a symbol "X" means the interface wlan1 has been disabled)
(Check interface whether interface wlan1 has disable or not, if mark a symbol "X" means the interface wlan1 has been disabled)
Disable Interface
• Via CLI
Non-aktif kan interface 0, 1, dan 2 dengan mengetikkan perintah "interface disable 0, 1, 2"
(Disable interface 0, 1, and 2 with type command "interface disable 0, 1, 2")
(Disable interface 0, 1, and 2 with type command "interface disable 0, 1, 2")

Cek interface tadi yang telah dinonaktifkan dengan mengetikkan perintah "interface print" jika terdapat tanda "X" pada interface 0, 1, dan 2 maka berarti interface telah berhasil dinonaktifkan
(Check the interface that had been disabled by typing the command "interface print" if there is an "X" on the interface 0, 1, and 2 then it means that the interface has been successfully disabled)
(Check the interface that had been disabled by typing the command "interface print" if there is an "X" on the interface 0, 1, and 2 then it means that the interface has been successfully disabled)

• Via GUI
Pilih "Interfaces"
(Choose "interfaces")
(Choose "interfaces")

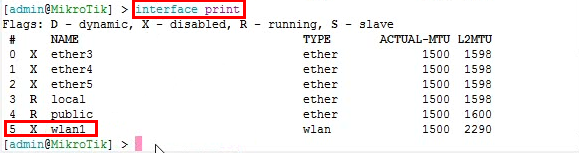
Terlihat interface 0, 1, dan 2 atau ether3, ether4, dan ether5 sudah berhasil dinonaktifkan
(Looks interface 0, 1, and 2 or ether3, ether4, and ether5 been successfully disable)
(Looks interface 0, 1, and 2 or ether3, ether4, and ether5 been successfully disable)

(Change Interface RouterBoard be a Interface Switch)
• Via CLI
Aktifkan interface 0, 1, dan 2 atau ether3, ether4, dan ether5
(Enable interface 0, 1, and 2 or ether3, ether4, and ether5)
(Enable interface 0, 1, and 2 or ether3, ether4, and ether5)

Cek interface apakah interface ether3, ether4, dan ether5 sudah aktif atau belum, jika sudah tidak ada tanda "X" berarti interface sudah berhasil di aktifkan
(Check whether the interface ether3, ether4, and ether5 is enable or not, if there is no symbol "X" means the interface has successfully enabled)
(Check whether the interface ether3, ether4, and ether5 is enable or not, if there is no symbol "X" means the interface has successfully enabled)

Cek interface ethernet dengan mengetikkan perintah "interface ethernet print"
(Check interface ethernet with type the command "interface ethernet print")
(Check interface ethernet with type the command "interface ethernet print")

Ubah interface ether3, ether4, dan ether5 menjadi interface switch dengan mengetikkan perinah "interface ethernet set (nomor interface) master-port=local"
(Change interface ether3, ether4, and ether5 be a interface with type the command "interface ethernet set (interface number) master-port=local")
(Change interface ether3, ether4, and ether5 be a interface with type the command "interface ethernet set (interface number) master-port=local")

Cek kembali interface ethernet nya apakah sudah menjadi interface switch atau belum, jika disebelah kiri nama interface terdapat tanda "S" dan pada MASTER-PORT berubah menjadi "local" berarti interface RouterBoard telah berhasil diubah menjadi interface Switch secara virtual
(Check again interface ether is already a switch interface or not, if the left side of the interface names are the "S" and the MASTER-PORT turned into "local" means RouterBoard interface has been successfully converted into a virtual switch interface)
(Check again interface ether is already a switch interface or not, if the left side of the interface names are the "S" and the MASTER-PORT turned into "local" means RouterBoard interface has been successfully converted into a virtual switch interface)

• Via GUI
Terlihat bahwa interface ether3, ether4 dan ether5 sudah berubah menjadi interface slave
(Looks taht interface ether3, ether4, and ether5 has change be interface slave)
(Looks taht interface ether3, ether4, and ether5 has change be interface slave)

Konfigurasi Internet
(Internet Configuration)
Static
IP Address
• Via CLI
Buat IP Address untuk interface public dan local dengan mengetikkan perintah "ip address add address=(IP Address/##) interface=(nama interface)"
(Create an IP address for the public and local interfaces by typing the command "ip address add address = (IP Address / ##) = interface (interface name)")
(Create an IP address for the public and local interfaces by typing the command "ip address add address = (IP Address / ##) = interface (interface name)")

Cek IP Address dengan mengetikkan perintah "ip address print"
(Check the IP address by typing the command "ip address print")
(Check the IP address by typing the command "ip address print")

• Via GUI
Pilih "IP → Addresses"
(Choose "IP → Addresses")
(Choose "IP → Addresses")

Hasil dari IP Address yang telah dibuat via CLI tadi
(Results of IP addresses that have been made via the CLI before)
(Results of IP addresses that have been made via the CLI before)

• Via CLI
Cek interface, terlihat interface wlan1 sedang di non-aktifkan
(Check the interface, the interface looks wlan1 are disabled)
(Check the interface, the interface looks wlan1 are disabled)

• Via GUI
Lalu pilih "Interfaces"
(Then choose the "Interfaces")
(Then choose the "Interfaces")

Klik pada interface "wlan1" lalu pilih tanda "ü" untuk aktifkan interface wlan1
(Click on the interface "wlan1" and choose the "ü" to enable the interface wlan1)
(Click on the interface "wlan1" and choose the "ü" to enable the interface wlan1)

Terlihat interface wlan1 telah aktif
(Choose interface wlan1 has enaled)
(Choose interface wlan1 has enaled)

• Via CLI
Cek interface apakah interface wlan1 sudah aktif atau belum dengan mengetikkan perintah "interface print" lalu tekan ENTER
(Check whether the interface wlan1 interface is enable or not with type the command "interface print" and then press ENTER)
(Check whether the interface wlan1 interface is enable or not with type the command "interface print" and then press ENTER)

• Via GUI
Pilih "Interfaces"
(Choose "Interfaces")
(Choose "Interfaces")
Lalu pilih tanda "+" untuk menambahkan IP Address
(Then choose the "+" to add the IP Address)
(Then choose the "+" to add the IP Address)

Langkah 1) Ketikkan IP Address sesuai dengan keinginan, 2) Pada Interface pilih interface apa yang ingin ditambahkan atau dibuat baru untuk IP Address nya, 3) Klik Apply
(Step 1) Type the IP Address liking, 2) At the interface Interface choose what you want added or created new to its IP Address, 3) Click Apply)
(Step 1) Type the IP Address liking, 2) At the interface Interface choose what you want added or created new to its IP Address, 3) Click Apply)

Jika sudah di klik Apply maka akan otomatis Network nya akan terisi sendiri, lalu klik OK
(If it is in the click Apply then it will automatically be charged the Network of his own, and then click OK)
(If it is in the click Apply then it will automatically be charged the Network of his own, and then click OK)

Terlihat IP Address yang telah ditambahkan untuk interface wlan1
(Looks IP Address which have been added to the interface wlan1)
(Looks IP Address which have been added to the interface wlan1)

GATEWAY
• Via GUI
Ketikkan "ip route add dst-address=0.0.0.0/0 gateway=(ip gateway sesuai keinginan)" untuk menambah gateway
(Type "ip route add dst-address = 0.0.0.0 / 0 gateway = (ip gateway as desired)" to add the gateway)
(Type "ip route add dst-address = 0.0.0.0 / 0 gateway = (ip gateway as desired)" to add the gateway)

Cek ip route dengan mengetikkan "ip route print", terdapat IP gateway yang telah dikonfigurasi tadi
(Check ip route with type "ip route print", there is an IP gateway that has been configured before)
(Check ip route with type "ip route print", there is an IP gateway that has been configured before)

• Via GUI
Pilih "IP → Routes"
(Choose "IP → Routes)
(Choose "IP → Routes)

Pada gateway yang telah dikonfigurasi tadi terlihat ada tulisan "AS" atau "Active Static"
(At the gateway that has been configured before seen the words "US" or "Active Static")
(At the gateway that has been configured before seen the words "US" or "Active Static")

DNS
• Via CLI
Tambah atau buat dns dengan mengetikkan perintah "ip dns set servers=(dns sesuai keinginan) allow-remote-request=yes"
(Add or create a dns with type the command "ip set dns servers = (dns at will) allow-remote-request = yes")
(Add or create a dns with type the command "ip set dns servers = (dns at will) allow-remote-request = yes")

Cek dns dengan mengetikkan perintah "ip dns print"
(Check dns with type the command "ip dns print")
(Check dns with type the command "ip dns print")

Percobaan ping ke dns Google
(Test ping to Google)
(Test ping to Google)


Percobaan ping ke IP Gateway
(Test ping to IP Gateway)
(Test ping to IP Gateway)

• Via GUI
Pilih "IP → DNS"
(Choose "IP → DNS")

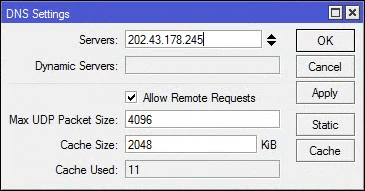
Langkah 1) Tuliskan dns pada kolom Servers, 2) Ceklis "Allow Remote Request", 3) Klik Apply, 4) Klik OK
(Step 1) Write dns Servers column, 2) Checklist "Allow Remote Request", 3) Click Apply, 4) Click OK)
(Step 1) Write dns Servers column, 2) Checklist "Allow Remote Request", 3) Click Apply, 4) Click OK)
Dynamic / DHCP
• Via CLI
Cek IP Address
(Check IP Address)
(Check IP Address)

Hapus ip address pada interface nomer 0 atau interface public
(Remove ip address on interface number 0 or interface public)
(Remove ip address on interface number 0 or interface public)

Cek ip address apakah ip address pada interface public masih ada atau sudah terhapus, jika tidak ada seperti gambar berikut berarti ip address telah berhasil dihapus
(Check whether the ip address on the public interface still exist or has been deleted, if it does not exist as shown below means that the IP address has been successfully removed)
(Check whether the ip address on the public interface still exist or has been deleted, if it does not exist as shown below means that the IP address has been successfully removed)

Membuat IP DHCP pada interface public dengan mengetikkan perintah "ip dhcp-client add interface=public add-default-route=yes use-peer-dns=yes" jika sudah tekan ENTER
(Creating DHCP IP on the public interface by typing the command "ip dhcp-client add interface = public add-default-route = yes use-peer-dns = yes" if you have press ENTER)
(Creating DHCP IP on the public interface by typing the command "ip dhcp-client add interface = public add-default-route = yes use-peer-dns = yes" if you have press ENTER)

Cek pada IP DHCP Client apakah sudah ada atau belum dengan mengetikkan perintah "ip dhcp-client print", jika seperti gambar berikut berarti IP DHCP Client berhasil dibuat, tetapi IP tersebut masih belum aktif
(Check the IP DHCP Client is already there or not by type the command "ip dhcp-client print", if as shown below means that the IP DHCP Client is successfully created, but the IP is still enable)
(Check the IP DHCP Client is already there or not by type the command "ip dhcp-client print", if as shown below means that the IP DHCP Client is successfully created, but the IP is still enable)

Aktifkan IP DHCP tersebut dengan mengetikkan perintah "ip dhcp-client enable number=(nomor interface yang mau di aktifkan)"
(Enable the DHCP IP by typing the command "ip dhcp-client enabled number = (number of interfaces that would in turn on)" )
(Enable the DHCP IP by typing the command "ip dhcp-client enabled number = (number of interfaces that would in turn on)" )

Cek kembali IP DHCP Client nya, jika sudah seperti gambar berikut berarti IP DHCP Client sudah berhasil diaktifkan
(Check back its IP DHCP Client, if it is like the following figure means the IP DHCP Client has been successfully enabled)
(Check back its IP DHCP Client, if it is like the following figure means the IP DHCP Client has been successfully enabled)

• Via GUI
Pilih "IP → DHCP Client"
(Choose "IP DHCP → Client")
(Choose "IP DHCP → Client")

Hasil dari IP DHCP yang telah dikonfigurasi sebelumnya via CLI, jika ingin mengubah konfigurasi nya bisa di klik 2 kali pada interface public
(Results from the DHCP IP that has been previously configured via CLI, if you want to change its configuration can click two times on the public interface)
(Results from the DHCP IP that has been previously configured via CLI, if you want to change its configuration can click two times on the public interface)

• Via CLI
Hapus IP DHCP Client dengan mengetikkan perintah "ip dhcp-client remove" lalu pilih nomor interface nya, lalu tekan ENTER
(Remove IP DHCP Client by typing the command "ip dhcp-client remove" and select the interface number, and press ENTER)
(Remove IP DHCP Client by typing the command "ip dhcp-client remove" and select the interface number, and press ENTER)

Cek IP Address, jika seperti gambar berikut berarti IP Address pada interface public telah berhasil dihapus
(Check the IP Address, if as shown below means that the IP address on the public interface has been successfully removed)
(Check the IP Address, if as shown below means that the IP address on the public interface has been successfully removed)

Buat IP Address pada interface public dengan mengetikkan perintah "ip address add address=(ip address sesuai keinginan) interface=public)"
(Create a public IP address on the interface by typing the command "ip address add address = (ip address as liking) interface = public)" )
(Create a public IP address on the interface by typing the command "ip address add address = (ip address as liking) interface = public)" )

Cek kembali IP Address dengan mengetikkan perintah "ip address print". Jika sudah seperti gambar berikut berarti konfigurasi IP Address pada interface public telah berhasil dibuat
(Check back IP address by typing the command "ip address print". If it is like the following picture means the IP address configuration on the public interface has been successfully created)
(Check back IP address by typing the command "ip address print". If it is like the following picture means the IP address configuration on the public interface has been successfully created)

Percobaan ping ke dns Google
(Test ping to dns Google)
(Test ping to dns Google)

Atur IP Address pada PC/Notebook anda agar satu lingkup dengan IP Address pada interface local anda di RouterBoard MikroTik
(Set the IP address of the PC / Notebook that the scope of the IP addresses on your local interface in RouterBoard MikroTik)

Buka Command Prompt atau CMD
(Open Command Prompt or CMD)
(Open Command Prompt or CMD)

Percobaan ping ke gateway interface local MikroTik
(Test ping to gateway interface local MikroTik)
(Test ping to gateway interface local MikroTik)

Percobaan ping ke gateway interface public MikroTik
(Test ping to gateway interface public MikroTik)
(Test ping to gateway interface public MikroTik)

Percobaan ping ke gateway interface public MikroTik, jika terdapat balasan RTO berarti anda harus melakukan konfigurasi Firewall NAT pada RouterBoard MikroTik
(Test ping to gateway interfaces MikroTik public, if there is a reply RTO means you must configure NAT Firewall on MikroTik RouterBoard)
(Test ping to gateway interfaces MikroTik public, if there is a reply RTO means you must configure NAT Firewall on MikroTik RouterBoard)

Firewall
NAT
• Via CLI
Ketikkan perintah "ip firewall nat add chain=srcnat out-interface=(nama interface yang ingin dimatikan firewall nya) action=masquerade"
(Type the command "ip firewall nat add chain = srcnat out-interface = (name of the firewall interface that wants to shut her) action = masquerade")
(Type the command "ip firewall nat add chain = srcnat out-interface = (name of the firewall interface that wants to shut her) action = masquerade")

Cek IP Firewall NAT dengan mengetikkan perintah "ip firewall nat print", jika seperti gambar berikut berarti IP Firewall pada interface public berarti sudah berhasil dimatikan
(Check IP Firewall NAT by type the command "ip firewall nat print", if as shown below means that the IP Firewall on the public interface means has been successfully turned off)
(Check IP Firewall NAT by type the command "ip firewall nat print", if as shown below means that the IP Firewall on the public interface means has been successfully turned off)

• Via GUI
Pilih "IP → Firewall"
(Choose "IP → Firewall)
(Choose "IP → Firewall)

Lihat dibagian "NAT", jika terdapat seperti ini berarti Firewall pada interface public telah berhasil dimatikan
(See the tab "NAT", if there is such a mean Firewall on public interfaces have been successfully turned off)
(See the tab "NAT", if there is such a mean Firewall on public interfaces have been successfully turned off)

Percobaan ping dari PC/Notebook ke gateway interface public MikroTik
(Test ping from PC/Notebook to gateway interface public MikroTik)
(Test ping from PC/Notebook to gateway interface public MikroTik)

Percobaan ping dari PC/Notebook ke dns Google
(Test ping from PC/Notebook to dns Google)
(Test ping from PC/Notebook to dns Google)


Untuk mengecek nya apakah sudah tersambung ke internet atau belum bisa juga dengan browser di Client. Kali ini saya mencoba mengakses website MikroTik "www.mikrotik.com"
(To check it if it's connected to the internet or not it could be with the browser on the client. This time I tried to access the website MikroTik "www.mikrotik.com")
(To check it if it's connected to the internet or not it could be with the browser on the client. This time I tried to access the website MikroTik "www.mikrotik.com")

D. Video Tutorial
UNTUK LEBIH JELASNYA DAPAT DILIHAT PADA VIDEO BERIKUT
(For more details Watch this VIDEO)
TERIMAKASIH
SEMOGA BERMANFAAT
WASSALAMU'ALAIKUM WR.WB
HOPE IT'S USEFUL
WASSALAMU'ALAIKUM WR.WB


)
0 comments:
Post a Comment