
Kali ini saya akan share tugas mengenai cara reset konfigurasi, aktif & nonaktifkan IP v6, menambahkan packages (user-manager), menaikkan & menurunkan versi, dan install ulang RouterBoard Mikrotik dengan NetInstall
(This time I will share how to reset the configuration, active and disable IP v6, add packages (user-manager), upgrade and downgrade version and re-install Mikrotik RouterBoard with Netinstall)

A. Tujuan
(Purpose)
- Dapat mengetahui cara reset konfigurasi MikroTik
- Dapat mengetahui cara aktif dan nonaktifkan IP v6 di MikroTik
- Dapat mengetahui cara menambahkan packages di MikroTik
- Dapat mengetahui cara menaikkan dan menurunkan versi MikroTik
- Dapat mengetahui cara install ulang RouterBoard MikroTik dengan menggunakan NetInstall
(- Can know how to reset the configuration MikroTik
- Can know how to active and disable IP v6 in MikroTik
- Can know how to add packages in MikroTik
- Can know how to upgrade and downgrade the MikroTik version
- Can know how to re-install the MikroTik RouterBoard using Netinstall )
B. Perlengkapan
(Materials)
- 1 Unit PC/Notebook
- RouterBoard
- Kabel UTP
- Kabel Power RouterBoard
( - 1 Unit PC/Notebook
- RouterBoard
- UTP Cable
- Power Cable RouterBoard )
C. Langkah Kerja
(Steps)
Terlebih dahulu matikan atau disable adapter "virtualbox host-only"
(First turn off or disable the adapter "virtualbox host-only")

Reset konfigurasi RouterBoard MikroTik
Buka WinBox, lalu klik "..." dan pilih connect menggunakan MAC Address. Kenapa harus connect menggunakan MAC Address ??? Karena RouterBoard ini belum mempunyai IP Address
(Open WinBox, then click "..." and select connect using the MAC address. Why should connect using the MAC Address ??? Because it does not have any RouterBoard IP Address)

Jika sudah seperti gambar berikut, klik "Connect"
(If it is like the following picture, click "Connect")

Reset konfigurasi RouterBoard agar RouterBoard dapat kembali menjadi ke konfigurasi awal / default. Klik "System → Reset Configuration"
(Reset configuration RouterBoard RouterBoard order to be able to return to the initial configuration / default. Click "System → Reset Configuration")

Jika muncul pop up seperti gambar berikut, klik "Reset Configuration"
(if a pop-up as shown below, click the "Reset Configuration")

Lalu pilih "Yes", maka RouterBoard akan mereset dan akan kembali ke konfigurasi awal / default
(Then select "Yes", the RouterBoard will be reset and will return to the initial configuration / default)

Maka RouterBoard akan mendapatkan konfigurasi default. Selanjutnya masuk menggunakan IP Address
(Then RouterBoard will get a default configuration. Next go using IP Address)

Jika sudah seperti gambar berikut, maka klik saja "Connect"
(If it is like the image below, then click "Connect")

Tampilan awal setelah tersambung ke WinBox, setelah RouterBoard dikembalikan ke konfigurasi awal / default
(The initial view after connecting to WinBox, after RouterBoard returned to the initial configuration / default)

Mengaktifkan IP v6
(Enable IP v6)
Pilih "System → Packages"
(Choose "System → Packages")

Klik ipv6 lalu pilih "Enable"
(Click ipv6, then choose Enable)

Di bagian scheduled pada ipv6 akan terdapat tulisan "scheduled for enable"
(In the Scheduled on ipv6 would the word "scheduled for enable")

Jika sudah, reboot RouterBoard agar setting an dapat terubah, Pilih "System → Reboot"
(If so, reboot RouterBoard an order setting can be modified, select "System → Reboot")

Pilih "Yes" untuk menyutujui reboot RouterBoard
(Select "Yes" to approve reboot the RouterBoard)

Coba remote lagi dengan WinBox, akan terdapat dua buah IP Address (IPv4 dan IPv6), pilih "Connect" menggunakan IPv4
(Try the remote again with WinBox, there will be two IP addresses (IPv4 and IPv6), select "Connect" using IPv4)

Jika sudah, klik "Connect"
(If so, click "Connect")

Cek lagi dengan membuka "System → Packages"
(Check again to open the "System → Packages")

IPv6 telah aktif
(IPv6 has been active)

Nonaktifkan IPv6
(Disable IPv6)
Buka WinBox, klik "..." lalu pilih "Connect" menggunakan IPv4
(Open WinBox, click "..." and select "Connect" using IPv4)

Pilih "System → Packages"
(Choose "System → Packages"

Klik ipv6 lalu pilih "Disable", maka dibagian scheduled pada ipv6 akan terdapat tulisan "scheduled for disable"
(Ipv6-click and select "Disable", the section will be scheduled on ipv6 it says "Scheduled for disabled")

Jika sudah, reboot RouterBoard agar setting an dapat terubah, Pilih "System → Reboot"
(If so, reboot RouterBoard order to change the settings, select "System → Reboot")

Pilih "Yes" untuk menyutujui reboot router
(Select "Yes" to approve reboot the router)

Remote lagi dengan menggunakan WinBox, klik "..." dan hanya ada satu pilihan IP Address, yaitu IP Address versi 4. Klik IP Address tersebut
(Remote again using WinBox, click "..." and there is only one IP Address option, ie IP addresses version 4. Click the IP Address)

Jika sudah, klik "Connect"
(If it's already, click "Connect")

Menambah Packages (User Manager)
Add Packages (User Manager)
Atur IP Address pada kabel adapter LAN
(Set the IP address on the LAN adapter cable)


Pasang kabel UTP ke port 2 (ethernet) pada RouterBoard dan pasang kabel UTP ke PC/Notebook. Klik "..." lalu pilih masuk menggunakan IP Address
(Plug the UTP cable to port 2 (Ethernet) on RouterBoard and pairs of UTP cable to the PC / Notebook. Click "..." and select the entry using the IP Address)
Jika sudah seperti gambar berikut, maka klik saja "Connect"
(If it is like the image below, then click "Connect")
Download packages user-manager di www.mikrotik.co.id, cari "Download Area"
(Download user-manager packages in www.mikrotik.co.id, search "Download Area")

Cari packages yang sesuai dengan versi OS RouterBoard anda, jika versi nya dibawah 6.25 maka klik yang saya tandai dengan kotak merah, yaitu "www.RouterOS.co.id"
(Find packages that fit your RouterBoard OS version, if the version is below 6.25 then click I marked with a red box, that is "www.RouterOS.co.id")

Pilih versi OS RouterBoard anda, saya pilih "5.26" karena OS RouterBoard saya masih v5.26
(Select your RouterBoard OS version, I choose "5:26" because I still v5.26 OS RouterBoard)

Pilih file yang akan didownload, jangan lupa disesuaikan dengan paket OS RouterBoard anda. Saya memilih yang "mipsbe" karena paket OS RouterBoard saya adalah mipsbe
(Select the file to be downloaded, do not forget customized with your RouterBoard OS package. I choose the "mipsbe" because I RouterBoard OS package is mipsbe)

Jika sudah didownload, maka selanjutnya extract file user-manager nya
(If you've downloaded, the file user-manager then extract)


Copy file user-manager tersebut
(Copy file the user-manager)

Kemudian balik ke WinBox, pilih tab Files
(Then turning to WinBox, select the Files tab)

Paste file user-manager.npk
(Paste file user-manager.npk)

Sedang proses mengupload file user-manager, harap tunggu sejenak
(In the process of uploading file user-manager, please wait)

File package user-manager sudah berhasil di upload dan package bertambah
(User-manager package file has been successfully uploaded and package increases)

Menaikkan Versi RouterBoard
(Upgrade Version RouterBoard)
Download RouterOS (ekstensi nya npk) yang versinya lebih baru atau diatas dari versi RouterOS yang kita miliki sekarang. Dapat didownload di www.mikrotik.co.id
(Download RouterOS (its extension npk) the newer version or above of the RouterOS version we have now. Can be downloaded in www.mikrotik.co.id)

Cari file yang telah didownload tadi, sehabis itu copy file nya
(Find files that have been downloaded before, after it copies its file)


Remote dengan menggunakan WinBox, lalu pilih tab "Files"
(Remote by using WinBox, then select the tab "Files")

Paste file RouterOS.npk tadi di File List
(Paste RouterOS.npk file earlier in the File List)

Sedang proses mengupload file, harap tunggu
(In the process of uploading files, please wait)

Setelah selesai akan muncul file yang tadi telah diupload
(After completion will appear this file has been uploaded)

Kemudian reboot RouterBoard agar versi RB dapat berhasil berubah , Pilih "System → Reboot"
(And then reboot RouterBoard order to be successful can chage RB version, select "System → Reboot")

Pilih "Yes"
(Choose "Yes")

Coba remote kembali dengan WinBox
(Try the remote back with WinBox)


Menaikkan versi RouterBoard sudah berhasil
(Version RouterBoard was upgarded succesfully)


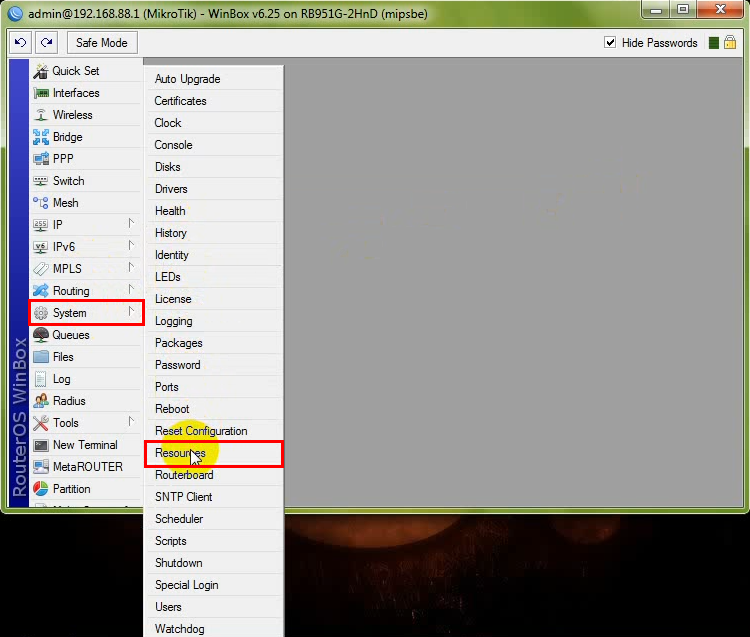
Cek dengan membuka "System → Reosurces"
(Check with the open "System → Reosurces")

Menurunkan Versi RouterBoard
(Downgrade Version RouterBoard)
Download RouterOS (ekstensi nya npk) yang versinya dibawah dari versi RouterOS yang kita miliki sekarang. Dapat didownload di www.mikrotik.co.id. Jika sudah didownload, cari file nya dan copy file routeros-mipsbe-5.26.npk
(Download RouterOS (its extension npk) the version below of RouterOS version we have now. Can be downloaded at www.mikrotik.co.id. If you've downloaded, locate the file and copy its files routeros-mipsbe-5.26.npk)


Masuk ke WinBox, Pilih "Files" dan paste kan file routeros-mipsbe-5.26.npk
(Sign in to WinBox, Select "Files" and paste the file routeros-mipsbe-5.26.npk)

Dalam proses mengupload file, harap tunggu. Jika file sudah berhasil di upload langkah selanjutnya yaitu buka packages
(In the process of uploading files, please wait. If the file has been successfully uploaded next step is to open the packages)

Pilih "System → Packages"
(Choose "System → Packages")

Pilih "Downgarde"
(Choose Downgrade)

(Reboot RouterBoard MikroTik)

Remote lagi dengan WinBox
(Remote again with WinBox)

Pilih "Connect"
( Choose Connect))

RouterBoard telah berhasil diturunkan versinya
(RouterBoard have successfully downgraded)

Install Ulang RouterBoard MikroTik
(NetInstall RouterBoard MikroTik)
Remote menggunakan WinBox, selanjutnya pilih "System → RouterBoard"
(Remote uses WinBox, then select "System → RouterBoard")

Pilih "Settings"
(Choose "Settings")

Pada Boot Protocol ganti dari nand-if-fail-then-ethernet menjadi try-ethernet-once-then-nand
(At the Boot Protocol instead of the nand-if-fail-then-ethernet into the try-ethernet-once-then-nand)

Jika sudah, pilih "Apply → OK"
(Is so finish, choose "Apply → OK)

Tutup WinBox nya
(Close WinBox program)

Jalankan aplikasi NetInstall (aplikasi untuk install ulang RouterBoard MikroTik), lalu pilih "Net booting"
(Run Netinstall application (application to reinstall RouterBoard MikroTik), then select "Net boot")

Centang "Boot Server enabled" lalu masukkan IP address untuk NetInstall. Karena di MikroTik saya menggunakan IP default dari MikroTik (192.168.88.1) dan di Client saya menggunakan IP address 192.168.88.2 maka agar satu jaringan pada NetInstall saya menggunakan IP address 192.168.88.3
(Check the "Boot Server enabled" and then enter the IP address for Netinstall. Because in my MikroTik MikroTik using default IP (192.168.88.1) and in my client using the IP address 192.168.88.2 then that the network on my Netinstall using the IP address 192.168.88.3)

Lakukan langkah-langkah berikut pada RouterBoard :
(Do the following steps on RouterBoard) :
1. Lepaskan kabel UTP yang berada di Port 2 (Ethernet)
( Remove the UTP cable is in Port 2 (Ethernet) )

↓

2. Pindahkan kabel UTP ke port 1 (PoE)
( Move UTP cable to port 1 (PoE) )

(Remove Power Cable on RouterBoard)

4. Colokkan kembali kabel power ke RouterBoard
(Plug back Power Cable on RouterBoard)

(Then Netinstall will detect the presence of RouterBoard)

Klik "Browse" untuk mencari folder yang didalmnya terdapat "routeros-mipsbe-6.25.npk"
(Click "Browse" to find the folder in which there are "routeros-mipsbe-6.25.npk")

Arahkan ke dalam folder yang telah berisi "routeros-mipsbe-6.25.npk", lalu klik OK
(Navigate to the folder that already contains "routeros-mipsbe-6.25.npk", and then click OK)

Jika sudah dipilih foldernya, ceklis "routeros-mipsbe-6.25.npk"
(If you've selected the folder, tick "routeros-mipsbe-6.25.npk")

Pilih Install
(Choose Install)

Dalam proses install ulang RouterOS MikroTik
(In the process of re-install the MikroTik RouterOS)

Jika sudah seperti ini, maka install ulang RouterOS MikroTik telah selesai
(If it is like this, then reinstall the MikroTik RouterOS has been completed)

Remote dengan menggunakan WinBox, RouterBoard kembali ke settingan default. IP Address belum ada, pilih MAC Address
(If it is like this, then reinstall the MikroTik RouterOS has been completed)

Klik Connect
(Click "Connect")

RouterBoard MikroTik telah berhasil di install ulang ke versi yang lebih baru
(RouterBoard MikroTik has succeeded in re-install newer version)


D. Video Tutorial
TERIMAKASIH
SEMOGA BERMANFAAT
WASSALAMU'ALAIKUM WR.WB
THANK YOU
HOPE IT'S USEFUL
WASSALAMU'ALAIKUM WR.WB


0 comments:
Post a Comment